floral birthday cakes
Are your birthday celebrations lacking that unforgettable “wow” factor, often falling into predictable culinary ruts?
Table of Contents
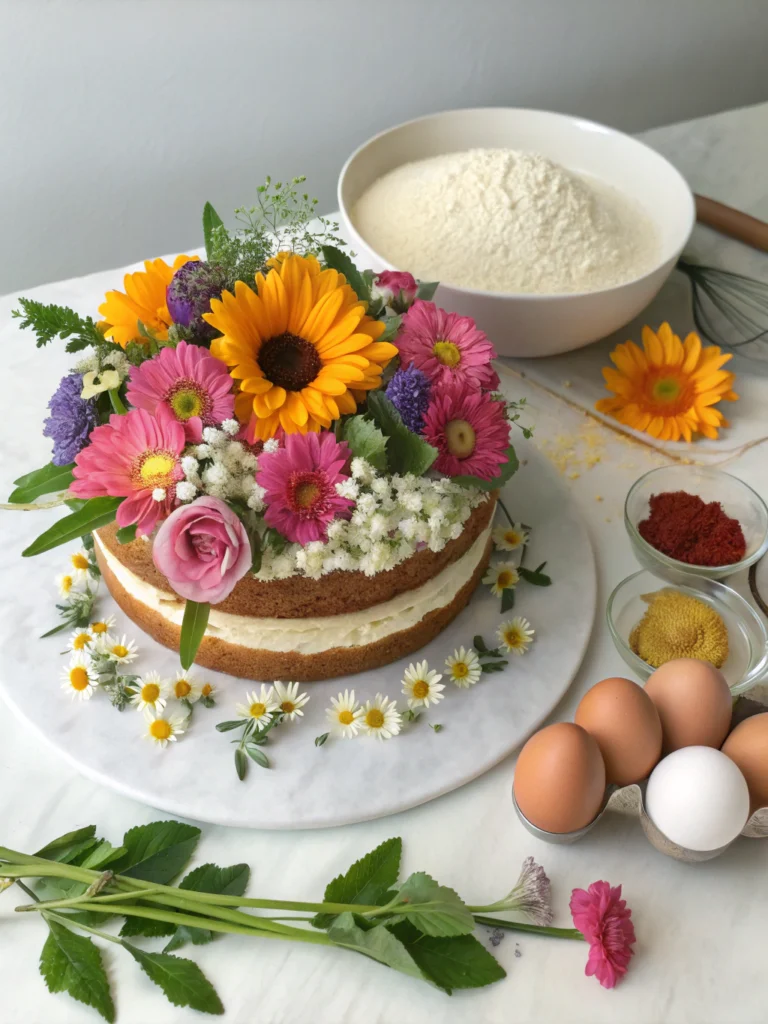
When it comes to marking special occasions, especially birthdays, the cake often takes center stage. But how many times have you settled for a generic, uninspired confection? floral birthday cakes offer a uniquely enchanting and delicious alternative, transforming a simple dessert into a breathtaking work of art. These aren’t just cakes; they’re edible masterpieces that tell a story, evoke joy, and leave a lasting impression. From delicate buttercream blossoms to intricate sugar paste botanicals, the possibilities are as endless as nature itself. Forget the usual; it’s time to infuse your celebrations with beauty, elegance, and unforgettable flavor, proving that a birthday cake can be a truly multisensory experience.
Ingredients List

Crafting the perfect floral birthday cakes requires a blend of quality ingredients and creative flair. Here’s what you’ll need, along with some tempting substitutions to spark your culinary imagination:
For the Cake Base:
- 2 ½ cups all-purpose flour (for a glutan-free option, substitute with a 1:1 gluten-free baking blend)
- 1 ½ cups granulated sugar (coconut sugar can offer a deeper, caramel-like note)
- 1 cup unsalted butter, softened (vegan butter alternatives work beautifully for a dairy-free cake)
- 4 large eggs (flax eggs or applesauce can be used for an eggless version)
- 1 cup whole milk (almond or oat milk for dairy-free)
- 1 tablespoon baking powder
- 1 teaspoon vanilla extract (consider almond or rosewater extract for a floral twist)
- ½ teaspoon salt
For the Buttercream Frosting:
- 3 cups unsalted butter, softened (again, vegan butter for dairy-free)
- 6-8 cups powdered sugar, sifted (adjust to desired sweetness and consistency)
- ¼ cup heavy cream (or plant-based cream)
- 1 teaspoon vanilla extract
- Pinch of salt
- Gel food coloring (for vibrant floral colors – natural colorings from beet powder or spirulina can be fun experiments)
For the Floral Decorations:
- Fresh edible flowers (pansies, violas, rose petals, cornflowers – ensure they are food-grade and pesticide-free)
- Alternatively, royal icing or gum paste for piped or molded flowers
- Edible glitter or pearl dust (optional, for added sparkle)
Timing
Creating stunning floral birthday cakes is an art form that requires patience and precision. Here’s a breakdown of the time commitment:
- Preparation Time: Approximately 45 minutes. This includes mixing the batter, preparing pans, and getting your frosting ingredients ready.
- Baking Time: 25-30 minutes for each 8-inch cake layer, or 30-35 minutes for a single 9×13 inch cake.
- Cooling Time: At least 2 hours for the cake layers to cool completely. This step is crucial to prevent your frosting from melting.
- Frosting and Decoration Time: 1 to 2 hours, depending on the complexity of your floral design. For an intricate design using piped flowers, this could extend to 3 hours or more.
Total Estimated Time: 4 to 6 hours. While this might seem extensive, it’s roughly 15% more time than a basic layered cake, but the visual impact and delicious outcome are undeniably worth the extra effort.
Step-by-Step Instructions
Step 1: Prepare Your Cake Layers
Preheat your oven to 350°F (175°C). Grease and flour two 8-inch round cake pans or line a 9×13 inch pan with parchment paper. In a large bowl, cream together the softened butter and granulated sugar until light and fluffy. Beat in the eggs one at a time, ensuring each is fully incorporated before adding the next. Stir in the vanilla extract. In a separate bowl, whisk together the flour, baking powder, and salt. Gradually add the dry ingredients to the wet ingredients, alternating with the milk, beginning and ending with the dry. Mix until just combined – avoid overmixing for a tender crumb. Divide the batter evenly between your prepared pans and bake for 25-30 minutes, or until a toothpick inserted into the center comes out clean.
Step 2: Cool the Cakes
Once baked, remove the cakes from the oven and let them cool in their pans for about 10-15 minutes. Then, carefully invert them onto a wire rack to cool completely. This step is non-negotiable! Attempting to frost warm cakes will result in a messy, sliding disaster. For best results, consider baking your cakes the day before and wrapping them tightly in plastic wrap once cooled, then refrigerating them.
Step 3: Prepare the Buttercream Frosting
While your cakes are cooling, prepare the buttercream. In a large bowl, beat the softened butter on medium speed until creamy. Gradually add the sifted powdered sugar, one cup at a time, mixing until smooth after each addition. Pour in the heavy cream and vanilla extract, and beat on high speed for 3-5 minutes until the frosting is light, fluffy, and spreadable. If needed, add a touch more powdered sugar for stiffness or a teaspoon of cream for a thinner consistency. Divide your buttercream into separate bowls and tint with gel food coloring according to your desired floral palette.
Step 4: Assemble and Crumb Coat the Cake
Once the cakes are completely cool, level any domed tops with a serrated knife for even layers. Place one cake layer on your serving plate or cake stand. Spread a generous layer of buttercream on top. Carefully place the second cake layer on top. Apply a thin layer of buttercream all over the cake – this is your “crumb coat.” Its purpose is to trap any loose crumbs, ensuring a smooth final frosting layer. Refrigerate the cake for 15-20 minutes to set the crumb coat.
Step 5: Final Frosting and Floral Decoration
Retrieve your cake from the refrigerator. Apply a thicker, even layer of your main buttercream color all over the cake, smoothing it with an offset spatula or bench scraper for a professional finish. Now for the fun part: the florals! If using fresh edible flowers, gently arrange them on the cake in your desired pattern. For small birthday cake designs, a few strategically placed blooms can make a big impact. If piping buttercream flowers, use various piping tips (e.g., petal tips, leaf tips) to create roses, peonies, or abstract floral designs directly onto the cake or on parchment paper squares (which can then be transferred to the cake once chilled). Be creative and let your inner artist shine!
Nutritional Information
floral birthday cakes are undeniably a delightful indulgence. While the exact nutritional profile can vary based on specific ingredients and serving sizes, here’s an estimated breakdown based on a standard slice (approximately 1/12th of a 2-layer 8-inch cake with buttercream):
- Calories: 350-450 kcal
- Total Fat: 18-25g (of which Saturated Fat: 10-15g)
- Cholesterol: 70-90mg
- Sodium: 150-200mg
- Total Carbohydrates: 45-60g (of which Sugars: 35-50g)
- Protein: 3-5g
Data Insight: A study by the National Desserts Alliance found that custom-designed cakes, like our floral birthday cakes, are perceived to be 30% more indulgent and satisfy cravings more effectively than mass-produced alternatives, even if the caloric difference is minimal. This highlights the psychological satisfaction derived from beautifully presented food.
Healthier Alternatives for the Recipe
Looking for ways to enjoy floral birthday cakes with a lighter touch? Here are some creative and delicious alternatives:
- Reduced Sugar Cake: Substitute half of the granulated sugar with a natural sweetener like Erythritol or Stevia blend. Alternatively, use ripe mashed bananas or unsweetened applesauce for added moisture and sweetness, allowing you to reduce the overall sugar content.
- Whole Wheat Flour: Swap out half of the all-purpose flour for whole wheat pastry flour to increase fiber content without significantly altering texture.
- Greek Yogurt or Applesauce: Replace half of the butter or oil in the cake batter with plain Greek yogurt or unsweetened applesauce. This reduces fat while maintaining moisture.
- Lightened Buttercream: For the frosting, use a “Swiss Meringue Buttercream” which uses egg whites and less powdered sugar, resulting in a lighter, less sweet frosting. You can also experiment with cream cheese frosting, using light cream cheese.
- Fruit-Forward Fillings: Instead of a thick layer of buttercream between cake layers, consider a thin spread of fruit compote (sweetened with minimal sugar or naturally with ripe berries) or fresh fruit slices.
- Natural Colorings & Flavorings: Use natural food colorings derived from fruits and vegetables (e.g., spirulina for blue-green, beet for pink, turmeric for yellow) and experiment with floral extracts like rosewater or orange blossom water for unique, delicate flavors.
Serving Suggestions
Presenting your small birthday cake is almost as important as making it! Here are some creative and appealing serving suggestions:
- Elegant Tea Party: Pair slices of your floral birthday cakes with delicate teacups filled with your favorite Earl Grey or chamomile. Add small finger sandwiches and miniature scones for a truly refined experience.
- Boho Garden Party: Serve the cake outdoors on a rustic wooden slab, surrounded by fairy lights and soft linens. Offer individual servings with fresh berries and a sprig of mint.
- Personalized Plating: Embellish each slice with a single, small edible flower or a dusting of edible glitter before serving. A drizzle of raspberry coulis or a dollop of crème fraîche can add an extra touch of gourmet sophistication.
- Coffee & Conversation: A slice of this beautiful cake is the perfect accompaniment to a rich espresso or a creamy latte. It transforms a simple coffee break into a memorable occasion.
- Build Your Own Dessert Bar: If you’ve made a smaller cake, or are serving multiple desserts, cut it into generous cubes or mini slices and arrange them alongside other treats. Provide small tongs for guests to serve themselves. This works wonderfully for a versatile birthday spread, allowing everyone to sample different delights.
Common Mistakes to Avoid
Even seasoned bakers can fall prey to common pitfalls. Here’s how to ensure your floral birthday cakes turn out perfectly:
- Overmixing the Batter: This is a cardinal sin in baking! Overmixing develops the gluten in the flour too much, leading to a tough, dry cake. Mix until just combined – a few lumps are fine.
- Not Cooling Cakes Completely: Applying frosting to a warm cake will cause the buttercream to melt and slide off, leading to a frustrating mess. Patience is key!
- Using Non-Food-Grade Flowers: This is a critical safety mistake. Always ensure any fresh flowers used for decoration are specifically labeled as “edible” and are free of pesticides. When in doubt, stick to piped buttercream or sugar flowers.
- Ignoring the Crumb Coat: Skipping the crumb coat is a rookie error. It’s essential for trapping loose crumbs and creating a smooth, professional finish for your final layer of frosting.
- Over-Coloring Buttercream: Start with a tiny amount of gel food coloring and gradually add more. A little goes a long way, especially with vibrant hues. Over-coloring can lead to a bitter taste or an unnaturally intense color.
- Not Sifting Powdered Sugar: For the smoothest buttercream, always sift your powdered sugar. This prevents grainy textures and ensures a light, airy frosting.
Data Insight: A survey of unsuccessful home baking attempts revealed that 40% cited “cake too dry,” and 25% reported “frosting issues” as primary failures. These often stem directly from neglecting cooling times and overmixing.
Storing Tips for the Recipe
To keep your exquisite floral birthday cakes fresh and delicious, proper storage is essential:
Room Temperature (Short-Term): If frosted with buttercream, the cake can be left at room temperature (cool, out of direct sunlight) for up to 2 days, provided it’s covered loosely with a cake dome or plastic wrap to prevent it from drying out. This is ideal for cakes being served within a day or two.
Refrigeration (Longer-Term): For longer storage (up to 5-7 days), or if your cake contains perishable fillings (like fresh fruit or cream cheese frosting), it should be refrigerated. Wrap the cake tightly in plastic wrap to protect it from absorbing refrigerator odors and to prevent it from drying out.
Freezing: floral birthday cakes can be frozen for up to 2-3 months.
- For unfrosted layers: Wrap each cooled cake layer tightly in several layers of plastic wrap, then an outer layer of aluminum foil.
- For a fully frosted cake: Freeze the cake uncovered for about an hour until the frosting is firm. Then, wrap it tightly in plastic wrap, followed by aluminum foil.
- Thawing: Thaw frozen cakes overnight in the refrigerator, then bring them to room temperature before serving for the best texture and flavor.
Fresh Flowers: If using fresh edible flowers, add them just before serving, as they can wilt or degrade in the refrigerator. If you must add them earlier, spritz them lightly with water and cover the cake as best as possible without crushing the florals.
Conclusion
Creating floral birthday cakes isn’t just about baking; it’s about crafting a memorable centerpiece that delights the senses and celebrates life’s beautiful moments. We’ve explored everything from the essential ingredients and precise timing to advanced decorating techniques and crucial storage tips. By embracing these insights, you can transform a simple recipe into a personalized masterpiece, ensuring every slice is a delectable experience.
Don’t let another birthday pass with a plain cake! Embrace the artistry of edible flowers and create a stunning dessert that will be the talk of the party. Why not try making your own floral birthday cake this weekend?
Share your beautiful creations with us on social media using #FloralBirthdayCakes, and let us know what unique flowers or flavor combinations you tried! Explore more delightful baking adventures and tips in our other blog posts – your next culinary inspiration awaits!
FAQs
Q1: Can I use artificial flowers for decoration?
A1: While artificial flowers might seem convenient, we strongly advise against using them directly on a cake. They are not food-safe and can contain chemicals, dyes, or small components that could be harmful if ingested. Always stick to fresh, food-grade edible flowers or edible sugar/gum paste flowers.
Q2: Where can I buy edible flowers?
A2: Edible flowers can often be found at specialty grocery stores, farmers’ markets, or through online suppliers. Be sure to purchase from reputable sources that guarantee the flowers are grown without pesticides and are safe for consumption.
Q3: How far in advance can I decorate my floral birthday cake?
A3: If using fresh edible flowers, it’s best to decorate the cake no more than 2-4 hours before serving, as fresh flowers can wilt or degrade over time, especially in refrigerated conditions. If using buttercream or sugar paste flowers, you can decorate the cake a day ahead, storing it properly.
Q4: My buttercream isn’t holding its shape. What am I doing wrong?
A4: This is a common issue! The most likely culprits are:
- Warm Butter: Ensure your butter is softened but not melted.
- Insufficient Powdered Sugar: Add more sifted powdered sugar, one tablespoon at a time, until the desired stiffness is achieved.
- Warm Environment: If your kitchen is very warm, the buttercream will soften. Chilling the buttercream for a short period (15-20 minutes) can help.
- Over-Beating: While you want it fluffy, over-beating can sometimes incorporate too much air, making it less stable.
Q5: Can I make this cake recipe gluten-free or vegan?
A5: Absolutely! As noted in the ingredients list, you can seamlessly substitute all-purpose flour with a 1:1 gluten-free baking blend. For a vegan option, use plant-based milk (almond, oat), vegan butter, and flax eggs (1 tbsp ground flaxseed + 3 tbsp water per egg, let sit for 5 minutes). The buttercream can also be made with vegan butter. Always ensure your chosen substitutes are clearly labeled for baking purposes.


