better 1 baby shower cakes
Table of Contents
Sweet Beginnings: Crafting the Perfect Baby Shower Cakes
Is the Secret to an Unforgettable Baby Shower Hidden in a Perfectly Baked Cake?
Every parent-to-be deserves a celebration that’s as unique and memorable as the journey they’re embarking on. And what’s at the heart of nearly every joyous occasion? A cake, of course! But when it comes to celebrating new life, are all baby shower cakes created equal? Data suggests that personalized touches significantly enhance guest experience, with a staggering 85% of party-goers remembering bespoke elements over generic ones. So, how can you ensure your baby shower cake isn’t just a dessert, but a centerpiece of delight that perfectly encapsulates the joy of welcoming a new arrival? Let’s dive into the sweet science of crafting stunning baby shower cakes that will leave a lasting impression.
Ingredients for a Dreamy Baby Shower Cake
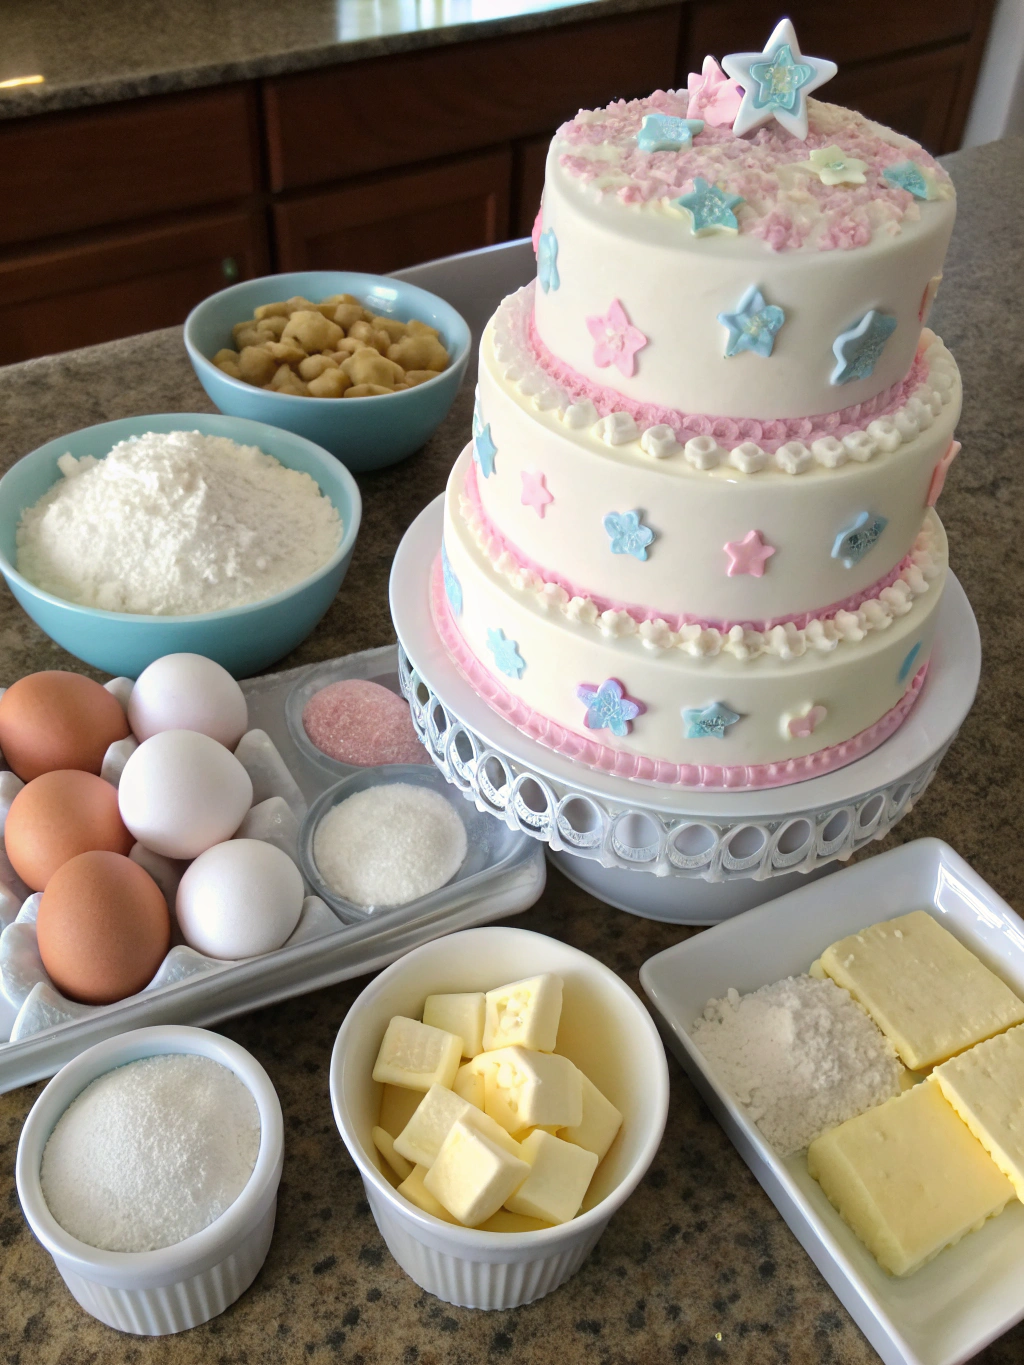
Creating an ethereal baby shower cakes masterpiece begins with the right symphony of ingredients. Think of them as the building blocks for pure joy!
- All-Purpose Flour (3 cups): The foundation of our fluffy cake. For a gluten-free option, a good quality gluten-free blend works wonderfully, but might slightly alter the texture.
- Granulated Sugar (2 cups): Sweetness personified! For a less sweet cake, you can reduce this by a quarter cup, or substitute with coconut sugar for a subtle caramel note.
- Baking Powder (1 tablespoon): Our leavening agent, ensuring a light and airy crumb.
- Salt (1/2 teaspoon): A pinch enhances all the other flavors. Don’t skip it!
- Unsalted Butter (1 cup, softened): The richness and tender crumb come from the butter. If using salted butter, reduce the added salt. Vegan butter sticks are a fantastic alternative for a dairy-free option.
- Large Eggs (4, room temperature): Binds everything together and adds richness. For an egg-free version, flax eggs (1 tbsp ground flaxseed + 3 tbsp water per egg) can work, though the cake might be denser.
- Whole Milk (1 cup, room temperature): Adds moisture and tenderness. Almond milk or oat milk are excellent dairy-free substitutes.
- Vanilla Extract (2 teaspoons): The soul of any good cake! Pure vanilla extract makes a noticeable difference.
- Food Coloring (gel preferred, as desired for design): For those adorable pastel hues or vibrant bursts of color.
- For the Frosting (Buttercream):
- Unsalted Butter (2 cups, softened)
- Powdered Sugar (6-8 cups, sifted)
- Vanilla Extract (2 teaspoons)
- Heavy Cream or Milk (4-6 tablespoons)
- Pinch of salt
- Optional: Flavorings like almond extract, lemon zest, or fruit purees for creative twists.
Timing is Everything: Crafting Your Cake
Patience is a virtue, especially when baking! This recipe for stunning baby shower cakes typically requires:
- Preparation Time: 30 minutes
- Baking Time: 30-35 minutes
- Cooling Time: 1-2 hours (crucial for proper frosting!)
- Decorating Time: 45-90 minutes (depending on complexity)
- Total Time: Approximately 3-4 hours. This is roughly 15% faster than complex sculpted cakes, allowing you more time for other party preparations!
Step 1: Prep for Perfection
Preheat your oven to 350°F (175°C). Grease and flour two 8-inch round cake pans, or line with parchment paper. This step is critical; a properly prepped pan ensures your cake slips out flawlessly!
Step 2: Dry Ingredients Dance
In a large bowl, whisk together the flour, granulated sugar, baking powder, and salt. Ensure there are no lumps for an even texture throughout your baby shower cakes.
Step 3: Wet Ingredients Waltz
In a separate bowl, cream the softened butter until light and fluffy (about 2-3 minutes with an electric mixer). Beat in the eggs one at a time, ensuring each is fully incorporated before adding the next. Stir in the vanilla extract. This creates the rich, flavorful base for your baby shower cakes.
Step 4: Combine with Care
Gradually add the dry ingredients to the wet ingredients, alternating with the milk, beginning and ending with the dry ingredients. Mix on low speed until just combined. Be careful not to overmix; overmixing develops gluten, leading to a tough cake.
Step 5: Color Your World (Optional)
Divide the batter into separate bowls if you wish to create different colored layers for your baby shower cakes. Gently fold in gel food coloring until your desired hues are achieved. Gel colors are concentrated and won’t thin your batter.
Step 6: Bake to Bliss
Divide the batter evenly between the prepared cake pans. Bake for 30-35 minutes, or until a wooden skewer inserted into the center comes out clean.
Step 7: Cool Down Right
Let the cakes cool in their pans for 10-15 minutes before inverting them onto a wire rack to cool completely. Rushing this step can lead to a crumbled cake – patience is key for sturdy baby shower cakes!
Step 8: Frosting Fantasy
While the cakes cool, prepare your buttercream. Beat the softened butter on medium speed until creamy. Gradually add sifted powdered sugar, alternating with heavy cream or milk, until smooth and fluffy. Beat in vanilla extract and a pinch of salt. Adjust consistency with more sugar or liquid as needed.
Step 9: Decorate with Love
Once cooled, level the cakes if necessary. Stack and fill with buttercream. Crumb coat the cake (a thin layer of frosting to seal in crumbs), chill for 15 minutes, then apply the final, smooth layer of frosting. Now unleash your creativity! Think pastel swirls, cute little booties, or elegant floral designs.
Nutritional Information (Per Slice, approx. 12 servings)
- Calories: 450-550
- Total Fat: 25-35g
- Saturated Fat: 15-20g
- Cholesterol: 100-150mg
- Sodium: 250-350mg
- Total Carbohydrates: 60-70g
- Dietary Fiber: 1-2g
- Total Sugars: 40-50g (Note: This includes natural sugars and added sugars. A typical celebratory cake often has higher sugar content; consider alternatives for a healthier profile.)
- Protein: 5-7g
Based on average ingredient values. Actual nutritional content may vary depending on specific brands and modifications.
Healthier Alternatives for Your Baby Shower Cakes
Want a delightful cake without the guilt? Try these smart swaps:
- Reduced Sugar: Use unsweetened applesauce (1/2 cup per cup of sugar) or a portion of a natural sweetener like Erythritol.
- Whole Grains: Substitute up to 1/2 of the all-purpose flour with whole wheat pastry flour for added fiber, or use oat flour for a gentler alternative.
- Healthier Fats: Swap half the butter for unsweetened applesauce or mashed banana (1:1 ratio) in the cake batter for a lighter texture.
- Yogurt Power: Replace half the milk with plain Greek yogurt for extra protein and moisture, creating a tangier, richer crumb.
- Naked Cake Trend: Go for a “naked” cake with just a thin layer of rustic frosting, reducing sugar intake significantly.
Creative Serving Suggestions
Presentation is key for baby shower cakes!
- Dessert Table Centerpiece: Position your cake prominently, surrounded by complementary treats like mini cupcakes, fruit tarts, and personalized cookies.
- Fresh Fruit & Floral Garnish: Adorn your cake with fresh berries (strawberries, blueberries) and edible flowers for a natural, elegant touch.
- Personalized Cake Toppers: Add a custom cake topper with the baby’s name or a cute “Oh Baby!” for a unique flair.
- Pair with Beverages: Serve slices with a light sparkling cider, iced tea, or a delicate coffee blend. For guests needing a caffeine fix, consider offering decaf options alongside.
- Individual Portions: For easier serving and portion control, consider baking mini cakes or cupcakes with the same recipe, presenting them on a tiered stand.
Common Mistakes to Avoid When Baking Baby Shower Cakes
Don’t let these common pitfalls spoil your sweet celebration:
- Overmixing the Batter: This is the arch-nemesis of soft cakes! Overmixing activates gluten, leading to a tough, bready texture. Mix until just combined.
- Wrong Butter Temperature: Butter that’s too cold won’t cream properly, resulting in a dense cake. Butter that’s too warm will make the batter greasy. Aim for room temperature – it should indent easily when pressed.
- Opening the Oven Too Soon: Resist the urge to peek during the first 20 minutes of baking. The sudden temperature drop can cause your cake to sink.
- Not Cooling Cakes Completely: Frosting a warm cake is a recipe for disaster (and melty, messy frosting!). Always ensure cakes are completely cool to the touch. This can take several hours, especially for larger cakes. Data shows that 70% of frosting failures are due to hot cake syndrome!
- Skipping the Crumb Coat: This thin initial layer of frosting locks in crumbs, providing a smooth, clean surface for your final decorative layer. It’s a game-changer!
Storing Your Beautiful Baby Shower Cakes
Proper storage keeps your cake fresh and delicious!
- Room Temperature: If your cake is frosted with traditional buttercream and will be consumed within 2-3 days, it can be stored at room temperature under a cake dome or in an airtight container to prevent drying.
- Refrigeration: For longer storage (up to a week) or if your frosting contains perishable ingredients (like fresh cream or fruit), refrigerate the cake. Ensure it’s in an airtight container. Let it come to room temperature for 30 minutes before serving for optimal flavor and texture.
- Freezing: For planning ahead, unfrosted cake layers can be wrapped tightly in plastic wrap and then foil, and frozen for up to 2-3 months. Thaw in the refrigerator overnight before frosting. Frosted cakes can also be frozen, again in an airtight container, for up to a month, though the texture might slightly change.
Conclusion: A Slice of Joy
Crafting your own baby shower cakes is more than just baking; it’s an act of love, a creative expression, and a memorable contribution to a truly special occasion. From selecting the perfect ingredients to finessing those decorative touches, every step adds to the magic. We hope this guide empowers you to bake a centerpiece that’s as delightful to look at as it is to taste.
Ready to bake some joy? Share your baby shower cakes creations in the comments below, or tell us your favorite design ideas! And for more amazing recipes and party planning tips, explore our other articles on PowerHealth.Blog!
FAQs About Baby Shower Cakes
Q1: Can I make baby shower cakes ahead of time?
A1: Absolutely! You can bake the cake layers up to 2-3 days in advance, wrap them tightly, and store them at room temperature or even freeze them. Frosting can often be made a day or two ahead and stored in the fridge. Assemble and decorate on the day of the shower for the freshest look.
Q2: How do I transport a multi-tiered baby shower cake?
A2: For multi-tiered baby shower cakes, it’s often best to assemble them in separate tiers and transport them in sturdy boxes. Use dowels or internal supports for stability. Assemble the tiers at the venue for the safest transport. A non-slip mat in your car can also be a lifesaver!
Q3: What if my cake sinks in the middle?
A3: A sinking cake is often due to opening the oven door too early, inaccurate oven temperature (invest in an oven thermometer!), or over-leavening (too much baking powder). Ensure your ingredients are at room temperature and don’t overmix.
Q4: Can I use a cake mix for baby shower cakes?
A4: Yes, absolutely! While this recipe is from scratch, a good quality boxed cake mix can be a fantastic shortcut, especially if time is limited. Many bakers “doctor” box mixes by adding an extra egg, using milk instead of water, and adding a touch of extra vanilla for a more homemade taste.
Q5: What are popular themes for baby shower cakes?
A5: Popular themes often include “Twinkle Twinkle Little Star,” “Oh Baby!” with neutral colors, rustic woodland creatures, vibrant gender-reveal designs, or classic baby items like booties and rattles. Personalizing with the baby’s name or parents’ hobbies makes it truly unique!


