

Breakfast at Tiffany’s isn’t just a film; it’s a cultural touchstone. From Audrey Hepburn’s indelible image in a Givenchy gown to the film’s complicated portrayal of identity and desire, it continues to captivate audiences. This article explores five of the most memorable moments centered around Breakfast at Tiffany’s, delving into their significance and enduring appeal. And because no Breakfast at Tiffany’s discussion is complete without thinking about pastries, we’ve included a detailed recipe for making your own delicious croissants. Get ready to immerse yourself in the world of Holly Golightly!


Table of Contents
Iconic Moment 1: The Window Gazing
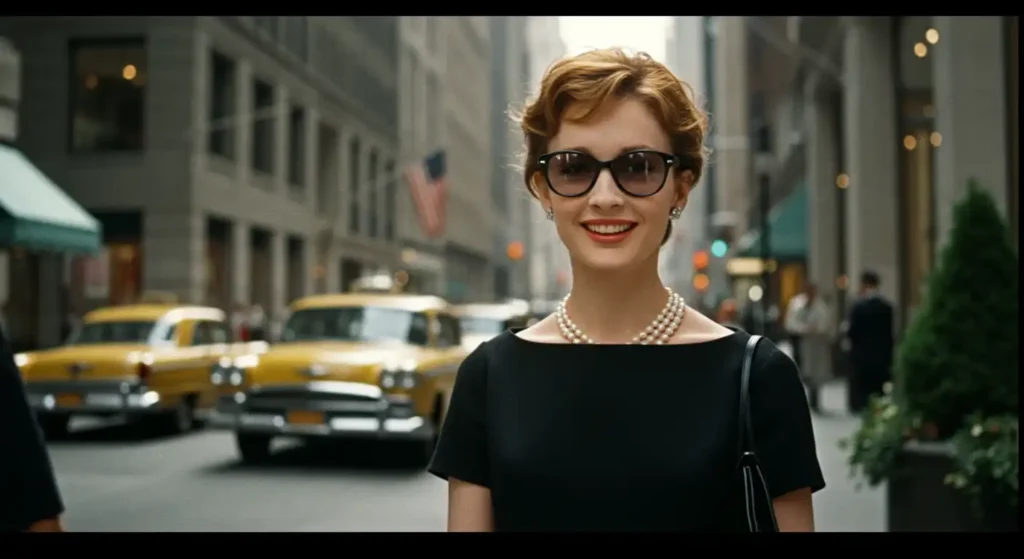
The opening scene of Breakfast at Tiffany’s is arguably the most iconic. We see Holly Golightly, dressed in a sophisticated black dress, adorned with pearls and oversized sunglasses, stepping out of a yellow taxi on a deserted Fifth Avenue. It’s dawn in New York City. With a paper bag in hand, she approaches the window of Tiffany & Co., takes out a Danish pastry and a cup of coffee, and begins her unusual breakfast.
This scene is more than just a visual spectacle; it’s a powerful introduction to Holly’s character.
- Dreaming and Aspiration: Gazing into the window of Tiffany’s symbolizes Holly’s aspirations for a life of elegance, wealth, and security. Tiffany’s represents everything she desires but doesn’t yet possess. She’s looking in, yearning to be a part of that world.
- Breakfast as a Metaphor: The unconventional breakfast of a pastry and coffee eaten on the street underscores Holly’s unconventional lifestyle. She’s not tied down by societal norms or expectations. She creates her own rules and finds beauty in the everyday.
- Solitude and Isolation: The deserted streets and Holly’s solitary breakfast hint at her loneliness and isolation. Despite being surrounded by people in the bustling city, she feels disconnected and adrift.
- Fashion and Iconography: The scene immediately established Audrey Hepburn as a fashion icon. The Givenchy dress, designed by Hubert de Givenchy specifically for Hepburn, became synonymous with elegance and sophistication. The oversized sunglasses and pearl necklace completed the look, making it instantly recognizable and endlessly imitated.
- The Allure of New York: The scene perfectly captures the allure of New York City as a place of dreams and possibilities. It’s a city where anything can happen, and where even a small-town girl can reinvent herself and strive for a better life.
This iconic moment sets the stage for the entire film, introducing the central themes of identity, ambition, and the search for belonging. It’s a visual poem that continues to resonate with audiences today. It embodies the essence of Breakfast at Tiffany’s.
Iconic Moment 2: Cat and the Apartment
Holly’s apartment is more than just a place to live; it’s an extension of her personality – chaotic, eclectic, and filled with a mix of borrowed elegance and makeshift charm. But one of the most significant characters within that space is “Cat.”
- Cat as a Symbol of Independence: Cat is a stray, reflecting Holly’s own sense of rootlessness and independence. She refuses to name him, stating, “He’s just a cat. We belong to nobody, and nobody belongs to us. We don’t even belong to each other.” This line encapsulates Holly’s fear of commitment and her desire to remain free from attachments.
- The Apartment’s Reflection of Holly: The apartment itself is a reflection of Holly’s transient lifestyle. The bathtub couch, the milk crate furniture, and the constant stream of guests create an atmosphere of temporary excitement and fleeting connections. It’s a space that feels constantly in flux, mirroring Holly’s own emotional state.
- The Absence of Roots: The lack of personal touches and family heirlooms in the apartment further emphasizes Holly’s lack of roots. She’s created a persona, a carefully constructed façade, and the apartment is a part of that performance.
- Contrast with Paul Varjak’s Space: The contrast between Holly’s chaotic apartment and Paul Varjak’s more organized and grounded space highlights their different approaches to life. Paul is searching for stability and meaning, while Holly is running from her past and clinging to a fragile sense of freedom.
- The Significance of Naming: Holly’s refusal to name Cat is directly related to her inability to form meaningful connections. Giving a name would imply ownership and responsibility, things she actively avoids. The climax of the film, where she searches for Cat in the rain, marks a turning point in her character development, signifying her willingness to embrace vulnerability and commitment.
The apartment and Cat are essential elements in understanding Holly’s character and her journey. They represent her longing for connection, her fear of commitment, and her ultimately successful search for self-acceptance. They are integral parts of the story of Breakfast at Tiffany’s.
Iconic Moment 3: Rusty Trawler and the Socialite Scene
Holly’s interactions with Rusty Trawler and the other socialites she frequents offer a glimpse into the world of wealth, privilege, and superficiality that she aspires to enter. These scenes reveal the emptiness and moral ambiguity that lie beneath the glittering surface of high society.
- Rusty Trawler as a Symbol of Wealth and Status: Rusty represents the wealth and status that Holly desires. He is a caricature of the idle rich, constantly surrounded by sycophants and living a life of leisure. Holly sees him as a means to an end, a way to secure her financial future.
- The Socialite Circle as a Critique of High Society: The portrayal of the socialite circle is a critique of the shallowness and moral bankruptcy of high society. The characters are often portrayed as frivolous, self-absorbed, and disconnected from reality. Their conversations revolve around gossip, fashion, and fleeting pleasures.
- Holly’s Ambivalence: Holly is both attracted to and repelled by this world. She enjoys the glamour and excitement but also recognizes the emptiness and moral compromises that come with it. She’s playing a game, trying to navigate the social landscape and find her place within it.
- The Party Scenes as a Microcosm: The party scenes are a microcosm of Holly’s life. They are filled with music, laughter, and fleeting connections, but also with underlying tension and a sense of unease. Holly thrives in this environment, but she’s also constantly aware of the superficiality and artificiality of it all.
- The Disconnect from Authenticity: The scenes with Rusty and the socialites highlight Holly’s disconnect from her true self. She’s performing a role, playing the part of a sophisticated socialite, but underneath the surface, she’s still a vulnerable and insecure young woman searching for her place in the world. This highlights the central themes explored in Breakfast at Tiffany’s
These encounters with the wealthy elite are crucial in understanding Holly’s motivations and her internal conflict. They expose the allure and the emptiness of the world she seeks to conquer and ultimately lead her to question her own values and priorities.
Iconic Moment 4: The “Poor Slob” Speech
The “Poor Slob” speech, delivered by Paul Varjak, is a pivotal moment in the film. It forces Holly to confront her idealized image of herself and acknowledge the reality of her past.
- Paul as a Voice of Reason: Paul acts as a voice of reason and a catalyst for Holly’s self-reflection. He challenges her illusions and forces her to confront the truth about herself.
- The Unveiling of Holly’s Past: The speech reveals the details of Holly’s past as Lulamae Barnes, a young girl from rural Texas who married at a young age and abandoned her family to pursue a different life.
- The Critique of Holly’s Idealized Self: Paul accuses Holly of living in a fantasy world and refusing to acknowledge her past. He calls her out for trying to reinvent herself and running away from her problems. He points out that she’s building her happiness on unstable grounds.
- The Meaning of “Poor Slob”: Paul uses the term “poor slob” to describe someone who is lost, confused, and unable to connect with others. He argues that Holly is a “poor slob” because she’s afraid to be vulnerable and commit to genuine relationships.
- The Catalyst for Change: This speech is a turning point for Holly. It forces her to confront her past and acknowledge the pain and trauma she’s been trying to suppress. It’s the beginning of her journey towards self-acceptance and healing.
The “Poor Slob” speech is a powerful and confrontational scene that exposes Holly’s vulnerabilities and forces her to confront the truth about herself. It’s a crucial moment in her journey towards self-discovery and ultimately, towards finding a place where she truly belongs. It highlights the depth of the character of Breakfast at Tiffany’s.
Iconic Moment 5: The Rain Scene and Self-Discovery
The rain scene, where Holly desperately searches for Cat in the downpour, is the emotional climax of the film. It represents Holly’s willingness to embrace vulnerability and commitment.
- The Symbolism of the Rain: The rain represents cleansing and renewal. It washes away Holly’s past and allows her to start anew. It also symbolizes the emotional turmoil that she’s been trying to suppress.
- Cat as a Symbol of Connection: Cat, who she previously refused to name, becomes a symbol of connection and responsibility. Her frantic search for him demonstrates her willingness to embrace commitment and form genuine relationships.
- The Shedding of the Façade: In the rain, Holly’s carefully constructed façade crumbles. She’s no longer the sophisticated socialite; she’s a vulnerable and desperate young woman searching for something she’s lost.
- Acceptance and Vulnerability: Finding Cat and finally naming him signifies her acceptance of vulnerability and her willingness to embrace genuine connection. It’s a moment of profound emotional release.
- The Beginning of a New Chapter: The rain scene marks the beginning of a new chapter in Holly’s life. She’s finally ready to confront her past, embrace her true self, and build meaningful relationships.
The rain scene is a powerful and moving culmination of Holly’s journey. It represents her transformation from a detached and elusive figure into a more grounded and emotionally available person. It is the most important scene to understand the complexity of Breakfast at Tiffany’s.
The Perfect Breakfast: Homemade Croissants Recipe
While Holly Golightly famously ate a Danish pastry outside Tiffany’s, a flaky, buttery croissant feels like a more fitting accompaniment to the film’s elegance. Making croissants at home is a labor of love, but the result is undeniably worth the effort. Here’s a detailed recipe to guide you through the process:
Ingredients:
- For the Dough (Détrempe):
- 500g (4 cups) all-purpose flour, plus extra for dusting
- 10g (2 teaspoons) instant yeast
- 60g (1/4 cup) granulated sugar
- 10g (2 teaspoons) salt
- 240ml (1 cup) cold milk
- 60ml (1/4 cup) cold water
- 50g (1/4 cup) unsalted butter, melted
- For the Butter Block (Beurrage):
- 250g (1 cup + 1 tablespoon) unsalted butter, cold and firm
- For the Egg Wash:
- 1 large egg
- 1 tablespoon milk
Equipment:
- Stand mixer with dough hook attachment (optional, but highly recommended)
- Large mixing bowl
- Plastic wrap
- Rolling pin
- Baking sheet
- Parchment paper
- Pastry brush
Instructions:
Step 1: Prepare the Dough (Détrempe)
- Combine Dry Ingredients: In the bowl of a stand mixer (or a large mixing bowl), combine the flour, instant yeast, sugar, and salt. Whisk together to ensure even distribution.
- Add Wet Ingredients: Add the cold milk, cold water, and melted butter to the dry ingredients.
- Mix the Dough: Using the dough hook attachment (or your hands), mix the dough on low speed until it comes together. It should be slightly sticky but not overly wet. If the dough is too dry, add a tablespoon of cold water at a time until it reaches the desired consistency.
- Knead the Dough: Knead the dough for 5-7 minutes in the mixer (or 8-10 minutes by hand) until it becomes smooth and elastic.
- Shape and Chill: Form the dough into a rectangle, about 6×8 inches. Wrap it tightly in plastic wrap and refrigerate for at least 2 hours, or preferably overnight. This allows the gluten to relax, making it easier to roll out later.
Step 2: Prepare the Butter Block (Beurrage)
- Soften the Butter: Place the cold butter between two sheets of parchment paper.
- Shape the Butter: Using a rolling pin, gently pound the butter into a rectangle, about 6×8 inches. The goal is to create a uniform thickness and consistency. Be careful not to melt the butter; it should remain cold and firm.
- Chill the Butter: Wrap the butter block in parchment paper and refrigerate for at least 30 minutes to ensure it’s firm before layering it into the dough.
Step 3: Lamination – The First Turn
- Roll Out the Dough: On a lightly floured surface, roll out the chilled dough into a larger rectangle, about 12×16 inches. The dough should be about ¼ inch thick.
- Place the Butter: Place the cold butter block in the center of the dough rectangle.
- Fold the Dough: Fold one side of the dough over the butter, covering half of it. Then, fold the other side of the dough over the butter, creating a “book fold” or a “double fold.” The butter should now be completely enclosed within the dough.
- Seal the Edges: Gently press down on the edges of the dough to seal the butter inside.
- Roll Out Again: Rotate the dough 90 degrees. On a lightly floured surface, gently roll out the dough into a rectangle, about 12×18 inches. Be careful not to press too hard, as you want to maintain distinct layers of butter and dough.
- Fold into Thirds: Fold the dough into thirds, like folding a letter. This is called a “single fold” or a “letter fold.”
- Wrap and Chill: Wrap the dough tightly in plastic wrap and refrigerate for at least 1 hour. This allows the gluten to relax and prevents the butter from melting.
Step 4: Lamination – The Second Turn
- Repeat Rolling and Folding: Repeat the rolling, folding (single fold), wrapping, and chilling process from Step 3. It’s crucial to chill the dough between each turn to prevent the butter from melting and ensure distinct layers.
Step 5: Lamination – The Third Turn
- Repeat Rolling and Folding: Repeat the rolling, folding (single fold), wrapping, and chilling process from Step 3 one last time. You should now have completed three turns.
Step 6: Shaping the Croissants
- Chill the Dough: After the final turn, chill the dough for at least 2 hours, or preferably overnight. This will make it easier to handle and shape.
- Roll Out the Dough: On a lightly floured surface, roll out the chilled dough into a rectangle, about 12×24 inches, and about ⅛ inch thick.
- Trim the Edges: Use a pizza cutter or a sharp knife to trim the edges of the dough, creating a clean rectangle.
- Cut Triangles: Cut the dough into long, isosceles triangles, about 4 inches wide at the base. The number of triangles you get will depend on the size of your rectangle.
- Shape the Croissants: Gently stretch each triangle lengthwise. Starting at the base, roll the triangle tightly towards the point. Place the croissant on a baking sheet lined with parchment paper, with the point tucked underneath.
- Curve the Croissants: Gently curve the ends of the croissant inwards to create the classic crescent shape.
Step 7: Proofing the Croissants
- Proof the Croissants: Cover the croissants loosely with plastic wrap and let them proof at room temperature for 2-3 hours, or until they have almost doubled in size. The proofing time will depend on the temperature of your room. The croissants should feel light and airy.
Step 8: Baking the Croissants
- Preheat the Oven: Preheat your oven to 375°F (190°C).
- Prepare the Egg Wash: In a small bowl, whisk together the egg and milk.
- Egg Wash: Gently brush the croissants with the egg wash. Be careful not to press down too hard, as this can deflate them.
- Bake: Bake the croissants for 18-22 minutes, or until they are golden brown and crispy.
- Cool: Let the croissants cool on a wire rack for a few minutes before serving.
Tips for Perfect Croissants:
- Keep Everything Cold: The key to successful croissants is keeping the butter cold throughout the process. This prevents it from melting and ensures distinct layers of butter and dough.
- Use High-Quality Butter: Use high-quality European-style butter with a high fat content for the best flavor and flakiness.
- Be Patient: Making croissants is a time-consuming process, so be patient and don’t rush any of the steps.
- Chill Between Turns: Chilling the dough between each turn is crucial to prevent the butter from melting and to allow the gluten to relax.
- Proofing is Key: Don’t skip the proofing step. This allows the croissants to rise properly and develop their characteristic airy texture.
- Oven Temperature: Make sure your oven is properly preheated before baking the croissants. A hot oven is essential for creating a crispy exterior and a light, airy interior.
- Don’t Overbake: Overbaking can dry out the croissants. Keep a close eye on them and remove them from the oven when they are golden brown.
Enjoy your homemade croissants with a cup of coffee, just like Holly Golightly! This recipe will allow you to indulge in a little bit of Breakfast at Tiffany’s magic in your own kitchen.
The Enduring Legacy of Breakfast at Tiffany’s
Breakfast at Tiffany’s continues to resonate with audiences for several reasons:
- Audrey Hepburn’s Iconic Performance: Hepburn’s portrayal of Holly Golightly is unforgettable. She brought a unique blend of vulnerability, charm, and sophistication to the role, making Holly a complex and captivating character.
- The Timeless Themes: The film explores timeless themes of identity, ambition, loneliness, and the search for belonging. These themes are universal and continue to resonate with viewers of all ages.
- The Glamour and Romance: The film captures the glamour and romance of New York City in the 1960s. The fashion, the music, and the atmosphere create a world that is both alluring and escapist.
- The Ambiguity and Complexity: Breakfast at Tiffany’s is not a simple love story. It’s a complex and ambiguous film that raises questions about identity, morality, and the pursuit of happiness.
- The Visual Style: The film is visually stunning, with beautiful cinematography and iconic set design. The opening scene alone is enough to captivate viewers.
While the film has been subject to criticism for its portrayal of certain characters and themes, its cultural impact is undeniable. Breakfast at Tiffany’s remains a classic film that continues to inspire and enchant audiences around the world. It’s a reminder of the power of cinema to transport us to another time and place and to explore the complexities of the human condition. It is definitely a must-watch movie!