1 best cherry cheesecake recipe
Cherry Cheesecake Recipe: Dive into the world of creamy textures and tangy fruit with our ultimate guide to creating the perfect cherry cheesecake. This comprehensive article will not only provide you with a stellar recipe but also delve into the science, history, and culinary nuances that elevate this beloved dessert from good to unforgettable. We’ll cover everything from ingredient selection to troubleshooting common cheesecake woes, ensuring your journey to baking perfection is smooth and enjoyable. Get ready to impress your taste buds and your guests with a truly exceptional cherry cheesecake.
Table of Contents
The Allure of the Cherry Cheesecake Recipe
The Cherry Cheesecake Recipe holds a special place in the hearts of dessert lovers worldwide. It’s a symphony of flavors and textures: the buttery, crunchy graham cracker crust, the rich, velvety cream cheese filling, and the glistening, tart-sweet cherry topping. But its appeal extends beyond mere taste; it evokes feelings of comfort, celebration, and pure indulgence.
The origins of cheesecake itself can be traced back to ancient Greece, where it was served to athletes during the Olympic Games. Fast forward through Roman conquests and medieval European kitchens, and cheesecake evolved, adapting to regional ingredients and culinary traditions. The addition of cream cheese, a distinctly American innovation, in the 19th century revolutionized the dessert, giving birth to the classic New York-style cheesecake we know and love today. The pairing with cherries, a fruit celebrated for its vibrant color and distinctly tart flavor, was a natural evolution, adding a layer of sophistication and visual appeal that perfectly complements the creamy base.
This article aims to provide not just a recipe, but a holistic understanding of the Cherry Cheesecake Recipe, empowering you to master this delightful creation. We’ll explore the science behind its structure, the art of achieving the perfect consistency, and the subtle variations that can make your cheesecake truly unique.
Essential Ingredients for Your Cherry Cheesecake Recipe
Crafting the perfect Cherry Cheesecake Recipe begins with understanding your ingredients. Each component plays a crucial role in the final texture, flavor, and appearance of your dessert.
The Crust: Foundation of Flavor
The crust is the unsung hero of any cheesecake. While graham cracker crumbs are traditional, you have options.
- Graham Cracker Crumbs: These provide a classic, sweet, and slightly spiced base. Ensure they are finely crushed for a cohesive crust. You can achieve this using a food processor or by placing crackers in a Ziploc bag and crushing them with a rolling pin.
- Melted Butter: Unsalted butter is preferred as it allows you to control the salt content of the crust. It binds the crumbs together and creates a sturdy base that won’t crumble when cut.
- Sugar: A touch of granulated sugar enhances the sweetness and helps with browning. Brown sugar can also be used for a deeper, molasses-like flavor.
Alternative Crusts:
- Oreo Cookies: For a decadent chocolate base, crushed Oreo cookies (filling and all) can be used instead of graham crackers. Adjust butter slightly as Oreos contain fat.
- Digestive Biscuits: Popular in the UK, these offer a slightly nuttier, less sweet alternative to graham crackers.
- Shortbread Cookies: Crushed shortbread provides a rich, buttery, and delicate crust.
The Filling: The Creamy Heart of Your Cherry Cheesecake Recipe
This is where the magic happens. The quality and temperature of your ingredients are paramount for a smooth, lump-free filling.
- Cream Cheese: This is the star. Use full-fat block cream cheese, not the softened, whipped, or light versions in tubs. Block cream cheese has less water content, which is crucial for a firm, rich cheesecake. Ensure it’s at room temperature for at least an hour (preferably two). This is non-negotiable for a smooth batter that incorporates air evenly and avoids lumps. Check out this guide on achieving perfect cream cheese consistency: https://www.powerhealth.blog/
- Granulated Sugar: Sweetens the cream cheese and contributes to the creamy texture by dissolving into the batter.
- Sour Cream (or Greek Yogurt): This is a secret weapon that adds tanginess, moisture, and helps prevent cracking. It also contributes to the signature “cheesecake tang.” Full-fat sour cream is best. Plain, full-fat Greek yogurt can be a good substitute for a slightly lighter, tangier result.
- Large Eggs: Eggs are the primary binding agent, providing structure and richness. Ensure they are at room temperature. Cold eggs can cause the batter to seize and become lumpy. Beat them in one at a time, and only until just combined, to avoid incorporating too much air, which can lead to cracks.
- Vanilla Extract: Pure vanilla extract is essential for depth of flavor. Don’t skimp on quality here.
- Lemon Zest (Optional but Recommended): A little lemon zest brightens the flavor, cutting through the richness of the cream cheese and harmonizing beautifully with the cherries.
The Topping: The Crown Jewel of Your Cherry Cheesecake Recipe
The cherry topping is what gives the Cherry Cheesecake Recipe its iconic look and delightful fruity burst.
- Fresh or Frozen Cherries: You can use either. If using fresh cherries, pit them first. If using frozen, there’s no need to thaw them completely before cooking. Sweet cherries like Bing or Rainier work well, but tart cherries (Montmorency) offer a more traditional, vibrant flavor.
- Granulated Sugar: Adjust to taste, depending on the sweetness of your cherries and your personal preference.
- Cornstarch or Arrowroot Powder: These are thickening agents, creating that glossy, spoonable sauce.
- Water (or Cherry Juice/Liqueur): Used to dissolve the cornstarch and thin the sauce to the desired consistency. A splash of cherry liqueur (like kirsch) or almond extract can add another layer of complexity.
- Lemon Juice (Optional): A squeeze of lemon juice brightens the cherry flavor and prevents the topping from being too cloyingly sweet.
Understanding these ingredients and their roles is the first step toward mastering your Cherry Cheesecake Recipe. Now, let’s move on to the precise steps.
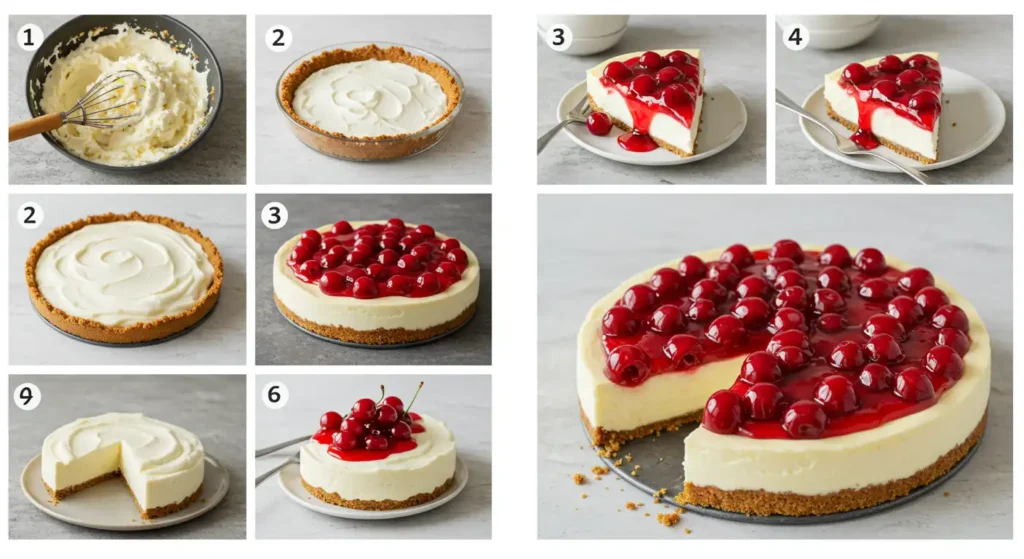
The Perfect Cherry Cheesecake Recipe: A Step-by-Step Guide
This Cherry Cheesecake Recipe focuses on precision and proper technique to ensure a flawless result every time. Follow these steps carefully, paying attention to temperatures and mixing times.
Equipment You’ll Need:
- 9-inch springform pan
- Aluminum foil (heavy-duty) for water bath
- Large mixing bowls
- Electric mixer (stand mixer with paddle attachment or hand mixer)
- Food processor (optional, for crumbs)
- Saucepan
- Measuring cups and spoons
- Rubber spatula
- Oven thermometer (highly recommended)
Step-by-Step Cherry Cheesecake Recipe:
Yields: 12-16 servings
Prep time: 45 minutes
Chill time: 6 hours to overnight
Bake time: 60-75 minutes
Phase 1: The Crust
Prepare the Pan (Critical Step for the Cherry Cheesecake Recipe): Preheat your oven to 325°F (160°C). Grease the bottom and sides of your 9-inch springform pan. Wrap the outside of the pan tightly with two layers of heavy-duty aluminum foil, ensuring no water can seep in if using a water bath. This is crucial for preventing a soggy crust and ensuring even baking.
Make the Crust Mixture: In a medium bowl, combine 1 ½ cups (approximately 18-20 whole graham crackers) finely crushed graham cracker crumbs, 1/4 cup granulated sugar, and 6 tablespoons (3/4 stick) melted unsalted butter. Mix with a fork until the crumbs are evenly moistened and resemble wet sand.
Press the Crust: Pour the crumb mixture into the prepared springform pan. Using the bottom of a flat-bottomed glass or your fingers, firmly press the mixture evenly across the bottom of the pan and about 1 inch up the sides. Ensure it’s compact. Bake the crust for 8-10 minutes until lightly golden. This pre-baking step helps create a crispier crust that is less likely to become soggy. Remove from oven and set aside to cool slightly while you prepare the filling.
Phase 2: The Filling
Prepare for the Filling (Key to Smoothness for this Cherry Cheesecake Recipe): Ensure all your cold ingredients (cream cheese, eggs, sour cream) are at room temperature. This is arguably the most important step for a silky-smooth, lump-free cheesecake. Room temperature ingredients combine more easily and smoothly, preventing overmixing.
Cream the Cream Cheese: In a large mixing bowl, using an electric mixer with the paddle attachment (or a hand mixer), beat three 8-ounce packages (24 ounces total) full-fat block cream cheese on medium-low speed for 2-3 minutes until completely smooth and lump-free. Scrape down the sides of the bowl frequently. Do not incorporate too much air at this stage.
Add Sugar and Flavorings: Gradually add 1 ½ cups granulated sugar to the cream cheese, beating on medium-low speed until just combined and smooth, about 1-2 minutes. Scrape down the bowl. Beat in 1/2 cup full-fat sour cream (or plain Greek yogurt), 1 tablespoon pure vanilla extract, and ½ teaspoon lemon zest (if using) until just incorporated. Again, do not overmix.
Incorporate Eggs Gently: Add 4 large eggs, one at a time, beating on the lowest speed only until each egg is just combined with the mixture. Scrape down the bowl after each addition. Overmixing the eggs can incorporate too much air, which expands during baking and then collapses, leading to cracks. The goal is to gently blend, not whip.
Pour and Prepare for Baking: Pour the smooth cheesecake batter evenly over the pre-baked and slightly cooled crust in the springform pan. Gently tap the pan on the counter a few times to release any large air bubbles.
Phase 3: The Water Bath and Baking
The Water Bath (Essential for a Creamy Cherry Cheesecake Recipe): Place the foil-wrapped springform pan inside a larger roasting pan. Carefully pour very hot water into the roasting pan until it reaches about halfway up the sides of the springform pan. The water bath creates a humid environment, allowing the cheesecake to bake slowly and evenly, preventing cracks and ensuring a creamy, silky texture.
Bake the Cheesecake: Carefully transfer the roasting pan with the cheesecake to the preheated oven. Bake for 60-75 minutes. The cheesecake is done when the edges are set, but the center 2-3 inches still wobble slightly when you gently nudge the pan. An internal temperature of 150°F (65°C) is ideal. Do not overbake, as this is a common cause of cracks and a dry texture.
Cooling (Patience is Key for the Cherry Cheesecake Recipe): Once baked, turn off the oven, crack the oven door open slightly (you can prop it open with a wooden spoon), and leave the cheesecake in the water bath for 1 hour. This slow cooling helps prevent drastic temperature changes, which can cause cracking. After 1 hour, carefully remove the cheesecake from the water bath and remove the foil. Let it cool on a wire rack at room temperature for another 1-2 hours until completely cooled.
Chill Thoroughly: Once at room temperature, cover the cheesecake loosely with plastic wrap (avoid touching the surface) and refrigerate for at least 6 hours, or ideally overnight. Chilling is crucial for the cheesecake to firm up, develop its full flavor, and become easy to slice cleanly.
Phase 4: The Cherry Topping
Make the Cherry Topping (The Grand Finale): While the cheesecake chills, or just before serving, prepare the topping. In a medium saucepan, combine 3 cups fresh or frozen pitted cherries (if frozen, no need to thaw completely), ½ cup granulated sugar (adjust to your sweetness preference and cherry tartness), and 1 tablespoon fresh lemon juice (if using).
Thicken the Topping: In a small bowl, whisk together 2 tablespoons cornstarch (or arrowroot powder) with ¼ cup cold water (or cherry juice/liqueur) until no lumps remain, creating a slurry.
Cook the Topping: Bring the cherry mixture in the saucepan to a simmer over medium heat, stirring occasionally. Once simmering, slowly whisk in the cornstarch slurry. Continue to cook, stirring constantly, until the mixture thickens and becomes glossy, about 2-4 minutes. Remove from heat. Let the topping cool completely before pouring over the chilled cheesecake. Cooling prevents the warm topping from melting the cheesecake.
Serving Your Cherry Cheesecake Recipe:
Once the cheesecake is thoroughly chilled, carefully remove the sides of the springform pan. You can spread the cherry topping over the entire cheesecake, or serve individual slices with a dollop of topping. For perfectly clean slices, dip a sharp knife in hot water and wipe it clean between each cut.
Enjoy your masterpiece! This detailed Cherry Cheesecake Recipe will yield a dessert that is not only visually stunning but also bursting with flavor and boasts an incredibly smooth, creamy texture.
Elevate Your Cherry Cheesecake Recipe: Tips and Tricks for Success
Achieving that bakery-quality Cherry Cheesecake Recipe isn’t just about following steps; it’s about understanding the nuances. Here are advanced tips to take your cheesecake to the next level.
Common Cheesecake Challenges and How to Avoid Them:
- Cracks on Top: This is the most common complaint!
- Temperature of Ingredients: Always use room temperature cream cheese, eggs, and sour cream. Cold ingredients create lumps, which means you have to overmix, incorporating too much air.
- Overmixing: Once the cream cheese is smooth, add other ingredients on low speed, just until incorporated. Especially with eggs, mix only until the yolk disappears. Excess air expands during baking and then collapses, leading to cracks.
- Overbaking: A cheesecake is done when the edges are set and the center still has a slight wobble. An oven thermometer is your best friend. Overbaking dries out the cheesecake and causes cracks.
- Sudden Temperature Changes: The water bath is crucial. After baking, don’t remove the cheesecake from the oven immediately. Turn off the oven, crack the door, and let it cool gradually inside for an hour. Then cool completely at room temperature before chilling.
- Soggy Crust:
- Pre-baking: Always pre-bake your crust. This creates a barrier and crisps it up.
- Foil Wrap: Ensure your springform pan is wrapped tightly with heavy-duty aluminum foil (at least two layers) if using a water bath. This prevents water from seeping into the crust.
- Butter Ratio: Ensure you’re using enough melted butter to bind the crumbs properly.
- Lumpy Filling:
- Room Temperature Cream Cheese: Period. Softened cream cheese blends smoothly. Cold cream cheese will inevitably result in lumps.
- Proper Mixing: Start with beating the cream cheese alone until supremely smooth before adding anything else.
- Cheesecake Won’t Set:
- Full-Fat Cream Cheese: Use only full-fat, block cream cheese. Lower fat versions have more water and won’t set as firmly.
- Underbaking: Ensure the internal temperature reaches 150°F (65°C). The slight wobble should diminish significantly after chilling.
- Insufficient Chilling: Cheesecake NEEDS adequate chilling time (at least 6 hours, ideally overnight) to firm up properly.
Mastering the Water Bath:
The water bath (Bain-Marie) is your greatest ally for a perfect Cherry Cheesecake Recipe.
- Why it’s essential: It provides gentle, even heat from all sides, preventing the edges from baking faster than the center. It also creates a humid environment in the oven, which prevents the cheesecake surface from drying out and cracking.
- Setup: Place the foil-wrapped springform pan in a larger roasting pan. Add hot (not boiling) water from the kettle into the roasting pan, ensuring it comes halfway up the sides of the springform pan.
- Safety: Always be careful when transferring the roasting pan filled with water to and from the oven.
Ingredient Spotlights:
- Type of Cherries: Tart cherries (like Montmorency) are traditional for their vibrant color and balanced tartness that cuts through the richness of the cheesecake. Sweet cherries (like Bing) can also be used, but you might need to reduce the sugar in the topping. Frozen pitted cherries are a convenient and often high-quality option.
- Vanilla Excellence: Don’t skimp on quality pure vanilla extract. It enhances all the other flavors. For an extra touch, consider using vanilla bean paste or scraping a fresh vanilla bean into the batter.
- Lemon Zest’s Role: Lemon zest often goes unnoticed, but a small amount brightens the entire dessert and prevents the cheesecake from being overly heavy. It complements both the cream cheese and the cherries beautifully.
Baking Precision:
- Oven Calibration: Ovens can vary wildly. Invest in an inexpensive oven thermometer to ensure your oven is truly at the temperature you set it to. This eliminates a huge variable.
- Don’t Open the Oven Door: Resist the urge to peek during baking, especially during the first 45 minutes. This causes temperature fluctuations that can lead to cracks.
- Internal Temperature: For absolute certainty, use an instant-read thermometer. Insert it into the center of the cheesecake. 150°F (65°C) is your target.
Chilling is Paramount:
This cannot be stressed enough for any Cherry Cheesecake Recipe. Refrigeration allows the cheesecake to fully set, firm up, and develop its luxurious, dense texture. It also allows the flavors to meld and deepen. Rushing this step will result in a soft, messy cheesecake.
By incorporating these tips, you’ll not only execute the Cherry Cheesecake Recipe flawlessly but also understand the science and art behind it, making you a true cheesecake connoisseur.
Variations and Creative Twists on Your Cherry Cheesecake Recipe
While the classic Cherry Cheesecake Recipe is undeniably perfect, there’s always room for creative expression. Experimenting with different flavors and textures can yield exciting new versions of this beloved dessert.
Crust Innovations:
- Ginger Snap Crust: For a spicier, more aromatic base, use crushed ginger snap cookies instead of graham crackers. The warming spices of ginger and cinnamon pair beautifully with the creamy filling and tart cherries.
- Pretzel Crust: For a surprising sweet and salty contrast, try a crushed pretzel crust. The saltiness cuts through the richness of the cheesecake and the sweetness of the cherries, creating a unique flavor profile.
- Nut Crust: Combine finely ground nuts (almonds, pecans, or walnuts) with a smaller amount of graham cracker crumbs for a rich, nutty crust that adds complexity.
Filling Enhancements for Your Cherry Cheesecake Recipe:
- Almond Extract: A few drops of almond extract in the cream cheese filling or the cherry topping can beautifully complement the cherry flavor, as cherries and almonds share similar flavor compounds.
- Spiced Filling: A pinch of cinnamon or nutmeg in the filling can add a subtle warmth that enhances the overall flavor profile, especially during autumn or winter.
- Citrus Burst: Increase the lemon zest or add orange zest for a brighter, more aromatic twist.
- Ricotta Cheesecake: While not a pure cheesecake, incorporating some ricotta cheese (about 1 cup, drained) into the cream cheese filling can give it a lighter, slightly grainy, and more Italian-style texture.
- Chocolate Swirl: Melted and slightly cooled chocolate (dark or milk) can be swirled into the cheesecake batter just before baking for a marbled effect and a chocolatey surprise.
Cherry Topping Transformations:
- Boozy Cherries: Deglaze the pan with a splash of kirsch (cherry liqueur), brandy, or even red wine after cooking the cherries for an adult twist. Burn off the alcohol, leaving behind a deeper, more nuanced flavor.
- Berry Medley: Combine cherries with other berries like raspberries, blackberries, or blueberries for a mixed fruit topping that’s vibrant and multi-layered in flavor. For example, a “Cherry Raspberry Cheesecake Recipe.”
- Cherry Preserve Glaze: For a quicker option, gently warm a good quality cherry preserve or jam with a tablespoon of water or liqueur until it’s pourable, then use as a topping.
- Spiced Cherry Topping: Add a pinch of cinnamon, star anise, or a tiny amount of ground clove to your cherry topping as it cooks. These spices really highlight the cherry flavor.
Presentation and Garnishes:
- Chocolate Shavings: A sprinkle of dark chocolate shavings or mini chocolate chips can add a touch of elegance and an appealing textural contrast.
- Whipped Cream: A dollop of freshly whipped cream adds lightness and visual appeal, especially if you’re serving the cherry topping on the side.
- Fresh Mint Leaves: A few small fresh mint leaves strategically placed can add a pop of color and a refreshing aroma.
- Candied Cherries: For a gourmet touch, try garnishing with a few candied cherries. https://www.pinterest.com/ExperteRecipes/ – check out more dessert presentation ideas here!
Mini Cheesecakes:
For individual portions, bake your Cherry Cheesecake Recipe in a muffin tin lined with paper liners. Reduce baking time significantly (20-30 minutes, or until set). These are perfect for parties or portion control. The topping can be dolloped on top of each mini cheesecake after cooling.
By exploring these variations, you can tailor your Cherry Cheesecake Recipe to your personal preferences and occasion, turning a classic into a signature dish. Remember, baking is an adventure, so don’t be afraid to experiment after you’ve mastered the basic recipe.
The Science Behind the Perfect Cherry Cheesecake Recipe
Understanding the fundamental scientific principles at play in your Cherry Cheesecake Recipe can turn a good baker into a great one. It helps you troubleshoot, adapt, and truly master this delicate dessert.
Emulsification: The Smooth Operator
- Cream Cheese and Fat: Cream cheese is an emulsion of fat and water. When it’s at room temperature, the fats are softened, making them easier to blend smoothly with other ingredients like sugar and eggs. If the cream cheese is cold, the fat particles are hard, leading to lumps and a curdled appearance when mixed.
- Mixing Speed: Beating the cream cheese first, on its own, helps to break down any remaining lumps and introduces a small amount of air. When you add sugar, it dissolves into the fat and water, contributing to the creamy texture. When you add eggs, they help bind the fat and water together, creating a stable emulsion. Overmixing, however, incorporates too much air, creating a too-fluffy batter that is prone to cracking.
Denaturation and Coagulation: The Role of Eggs
- Egg Proteins: Eggs are crucial binders in any Cherry Cheesecake Recipe. They contain proteins that, when heated, undergo a process called denaturation (unfolding) and then coagulation (linking together). This causes the cheesecake to set and become firm.
- Gentle Heating (Water Bath): The water bath is key because it provides a gentle, even heat. If the heat is too high, the egg proteins coagulate too quickly and tightly, squeezing out moisture and leading to a dry, rubbery texture and, most importantly, cracks. The water bath ensures a slow, gradual set, resulting in that desirable silky, creamy consistency.
- Overbaking Eggs: Overbaking a cheesecake is essentially overcooking the eggs. When egg proteins are overcooked, they become tough and crumbly, which manifests as cracks on the surface and a dry interior.
Starch and Thickening in the Cherry Topping:
- Cornstarch/Arrowroot: These are starches. When heated in a liquid (like the cherry juice), the starch granules absorb water and swell, causing the liquid to thicken. This process is called gelatinization.
- Slurry: Dissolving the cornstarch in a small amount of cold water before adding it to the hot cherry liquid prevents lumps. If you add dry starch directly to hot liquid, the outside of the granules will gelatinize instantly, forming lumps that the water cannot penetrate to thicken the rest of the starch.
- Cooling Down: As the cherry topping cools, the starch molecules form even stronger bonds, causing the topping to thicken further to that desirable viscous consistency.
Sugar’s Multifaceted Role:
- Sweetness: Obvious, but important.
- Moisture Retention: Sugar is hygroscopic, meaning it attracts and holds onto water. In cheesecake, this helps keep it moist and prevents excessive drying during baking.
- Texture: Sugar contributes to a tender crumb and helps create the smooth texture by interfering with protein coagulation. Too little sugar can result in a tougher cheesecake.
- Browning: In the crust, sugar contributes to the Maillard reaction, leading to desirable browning and flavor development.
The Importance of Chilling:
- Flavor Development: Just like a good stew, the flavors in cheesecake deepen and meld when allowed to rest and chill.
- Firming Up: As the cheesecake cools, the fats in the cream cheese solidify and the protein networks from the eggs become more stable and firm. This is what allows you to cut clean slices. Baking sets the structure, but chilling strengthens it.
- Preventing Cracks (Post-Bake): The slow cooling process (in the oven, then at room temp, then chilling) minimizes thermal shock, which can cause internal tension and cracks.
By understanding these scientific principles behind each step of your Cherry Cheesecake Recipe, you gain an intuitive grasp of why certain actions are necessary. This knowledge empowers you to troubleshoot confidently and consistently achieve extraordinary results.
Troubleshooting Your Cherry Cheesecake Recipe: Common Issues and Solutions
Even experienced bakers encounter challenges. Don’t despair if your Cherry Cheesecake Recipe faces a hiccup. Understanding the common issues and their solutions will equip you to tackle them head-on, or prevent them altogether.
1. Cracks on the Surface: The Ultimate Cheesecake Foe
- Why it happens: This is usually due to rapid temperature changes, overbaking, or overmixing (incorporating too much air).
- Solutions:
- Room Temperature Ingredients: Ensure all dairy and eggs are at room temperature. This prevents lumps and reduces the need for aggressive mixing.
- Don’t Overmix: Beat cream cheese until smooth, then add other ingredients on low speed, only until just combined. Especially with eggs – add one at a time, mixing until just incorporated.
- Water Bath: Always use a water bath. It provides gentle, even heat and a humid environment, minimizing cracks.
- Don’t Overbake: Bake until the edges are set but the center still slightly wobbles (like soft jello). An oven thermometer helps confirm your oven temperature.
- Gradual Cooling: Turn off the oven, crack the door, and let the cheesecake cool in the oven (with the water bath) for an hour. Then remove to a wire rack to cool completely at room temperature before chilling. Avoid sudden cold drafts.
- Quick Fix (if it happens): Your cherry topping is a fantastic camouflage! If a crack appears, simply pour the cooled cherry topping generously over the top. No one will ever know.
2. Soggy Crust: A Common Disappointment
- Why it happens: Moisture from the filling or water from the bath seeps into the crust.
- Solutions:
- Pre-bake the Crust: Bake the crust for 8-10 minutes before adding the filling. This creates a barrier against moisture.
- Tight Foil Wrap: If using a water bath, wrap the springform pan very tightly with two layers of heavy-duty aluminum foil to prevent water infiltration.
- Don’t Over-Butter the Crust: Too much butter can make the crust greasy and prone to sogginess. Stick to the recipe’s ratio.
- Completely Cool Crust: Ensure the pre-baked crust is slightly cooled before adding the batter.
3. Lumpy Filling: Textural Troubles
- Why it happens: Cold cream cheese is the primary culprit.
- Solutions:
- Room Temperature Cream Cheese (and other dairy/eggs): Let your cream cheese sit out on the counter wrapped in its foil for at least 1-2 hours, or until very soft to the touch. This applies to sour cream and eggs too.
- Beat Cream Cheese First: Thoroughly beat the cream cheese alone until it’s completely smooth and creamy before adding any other ingredients. Scrape down the bowl multiple times.
- Sieve (Last Resort): If you still have a few small lumps after mixing, you can – very gently – push the batter through a fine-mesh sieve, but this adds air and should be avoided if possible.
4. Cheesecake Won’t Set / Too Loose: A Wobbly Disaster
- Why it happens: Underbaking, using low-fat cream cheese, or insufficient chilling.
- Solutions:
- Full-Fat Block Cream Cheese: Use only full-fat block cream cheese. Light or whipped versions have too much water and won’t set properly.
- Proper Baking Time/Temperature: Ensure you bake it to the correct doneness (edges set, center wobbly, no more than 150°F / 65°C internal temperature). If it’s still very liquid after the recommended time, continue baking in 5-minute increments.
- Adequate Chilling: This is non-negotiable. Refrigerate for at least 6 hours, or ideally overnight (12-24 hours). The cheesecake continues to set and firm up significantly during chilling.
- Don’t Open Oven Door: Avoid significant temperature drops during baking by not opening the oven door too frequently or for too long.
5. Cheesecake Tastes Too Dense/Heavy: Not Light Enough
- Why it happens: Overmixing (leading to too much air incorporated and then collapsing), or simply a preference for a lighter texture.
- Solutions:
- Sour Cream/Greek Yogurt: These ingredients add moisture and a slight tang that helps cut through the richness, making the cheesecake feel lighter.
- Lemon Zest: A touch of citrus brightens the flavor and balances the richness.
- Don’t Overmix Eggs: Overmixing eggs incorporates too much air, which expands then collapses, leading to a denser texture.
- Alternative for Lighter Texture: If you prefer an even lighter cheesecake, consider recipes that incorporate whipped egg whites (usually a different style, like a Japanese cotton cheesecake), but this particular Cherry Cheesecake Recipe aims for a classic dense and creamy New York-style texture.
By being aware of these potential pitfalls and their corresponding solutions, you’ll feel confident in tackling any Cherry Cheesecake Recipe and producing fantastic results consistently. Remember, practice makes perfect, and every bake is a learning experience!
Storing and Serving Your Cherry Cheesecake Recipe
You’ve mastered the art of baking the perfect Cherry Cheesecake Recipe, now let’s ensure you store it correctly and serve it beautifully to maximize enjoyment.
Storing Your Masterpiece:
- Refrigeration is Key: Cheesecake is a dairy-based product and must be refrigerated. Always store your Cherry Cheesecake Recipe in the refrigerator.
- Airtight Container: For optimal freshness and to prevent it from absorbing odors from other foods in your fridge, store the cheesecake in an airtight container. If you don’t have a container large enough, cover it loosely with plastic wrap, ensuring the plastic doesn’t touch the cherry topping too much (as it can stick).
- How Long Does It Last? Properly stored, your Cherry Cheesecake Recipe will remain fresh and delicious for 3-5 days in the refrigerator. The quality might slightly diminish after this period, but it’s generally still safe to eat.
- Freezing Cheesecake: Yes, you can freeze cheesecake!
- Before Topping: If you plan to freeze, it’s best to do so before adding the cherry topping. The topping can become watery or change texture upon thawing.
- Whole Cheesecake: Once fully chilled, wrap the cheesecake (without the topping) tightly in several layers of plastic wrap, then a layer of aluminum foil. Place it in a sturdy freezer-safe container or bag.
- Individual Slices: For convenience, cut the cheesecake into individual slices. Wrap each slice tightly in plastic wrap, then foil, and place them in a freezer bag. This allows you to thaw only what you need.
- Thawing: To thaw a whole cheesecake, transfer it to the refrigerator 24 hours before serving. For individual slices, 3-4 hours in the refrigerator should suffice. Allow it to come to almost room temperature before serving for the best texture and flavor. Add your freshly made cherry topping after thawing. Frozen cheesecake can last for 1-2 months.
Serving Your Cherry Cheesecake Recipe:
- Temperature for Optimal Flavor: While stored in the fridge, cheesecake is best served slightly chilled, but not ice-cold. For the most nuanced flavor and creamy texture, let the cheesecake sit at room temperature for 15-30 minutes before serving. This allows the fats to soften slightly, enhancing creaminess.
- Clean Slices: For beautiful, professional-looking slices:
- Use a very sharp, thin knife.
- Dip the knife in hot water before each cut.
- Wipe the knife clean with a paper towel between each slice. This prevents sticking and messy edges.
- Portioning: A 9-inch cheesecake can typically yield 12-16 generous slices, depending on how large you cut them.
- Elegant Presentation:
- Topping Placement: You can spread the entire cherry topping over the cheesecake before serving, or you can serve the cheesecake plain and add a dollop of topping to each individual slice. The latter allows for a cleaner look if you anticipate leftovers or want to give guests the option of adding more or less topping.
- Garnishes: A sprig of fresh mint, a dusting of powdered sugar, a few chocolate shavings, or a side of whipped cream can elevate the presentation of your Cherry Cheesecake Recipe.
- Plating: Serve slices on elegant dessert plates. Consider a small drizzle of chocolate sauce or a few fresh whole cherries on the side of the plate for added visual appeal.
By following these storage and serving tips, you’ll ensure that every slice of your homemade Cherry Cheesecake Recipe is as delightful as possible, from the first bite to the last. This concludes our comprehensive guide to mastering the cherry cheesecake. We hope you feel empowered and inspired to bake this incredible dessert!